

|
|
|||||||||||||||||
|
|
|
|
|||||||||||||||
|
|
|||||||||||||||||
 |
REWINDING A TRANSFORMER Here are some pics of a transformer rewind. Firstly, here is my trusty Aumann coil winder, which I obtained about ten years ago for four bottles of red wine. The winder was made in West Germany sometime in the 1950s, and for several decades was used by an Adelaide transformer maker - I was lucky enough to bump into the fellow who had been the production manager at the time they closed the factory, who wanted to clear his garage. 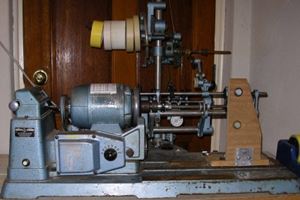 I had to build a new tail-stock, which is the timber support on the right hand side, fitted with a flexible bearing to take the coil shaft. The wire reels are mounted on the axles you can see coming off the upright stand, to the right and left (the left one is holding the tapes). There is a tension brake mechanism on each axle that can be fine tuned for the size of wire and reel being used. On the left is the counter, which goes up to 99,999. I hope I never see that many turns! 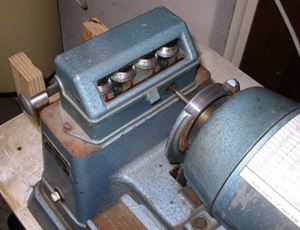 At the rear of the machine there is the traverse, which controls the direction and rate-of-drive of the guide carriage. The adjustable guides at the rear of the device can be set for different width coils and the point at which the direction changes. The traverse drive is a very clever piece of precision machining, but it's lost its accuracy over time - which means the machine isn't so good for very fine gauge wire as it once was, and thicker gauges need some manual assistance. But it sure beats a power drill in a vice!! 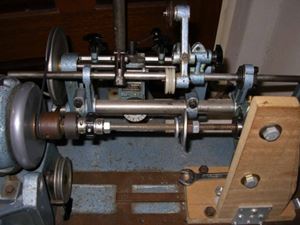 The motor runs the coil shaft, and a belt drives the traverse at the rear. The motor runs the coil shaft, and a belt drives the traverse at the rear.The wire guide wheels move back and forth on their guide shaft. Motor speed is adjustable, controlled by a foot pedal. The clutch mechanism is fitted with an instant stop solenoid. I adjust speed by keeping a hand on the fly wheel, which allows me to accelerate and slow down very gently indeed. Here is the coil bobbin we're going to use, and the pile of EI lam that has been salvaged from an old transformer. This is the original bobbin, covered with new tape to make a more even winding surface.  Here the bobbin has been fitted to the winding axle, using a pair of MDF blocks cut to size. 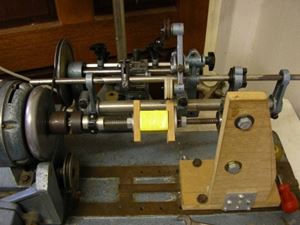 The first wire is fitted, and taped in place. We will wind the secondary first, because it has the finest wire (we are winding a step-up transformer). Here is the first layer (about 300 turns of 0.125mm wire). You can just see the wire running between the white and brown pulley and then up to the top of the picture. 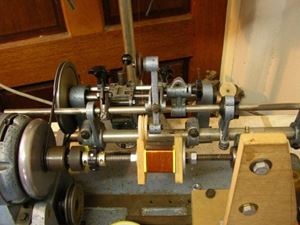 Here the coil is fitted with its first layer of insulation. Nothing special, just waxed paper from Woolworths or Coles supermarkets. I've found it's ideal for use between rows of fine wire, because it's thin, and the wax helps the wire bed itself into place. It's about 25 micron thick, so it's an ideal thin insulator. 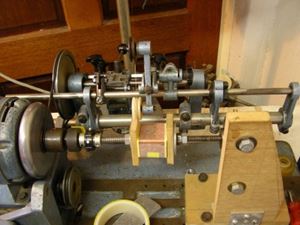 720 turns later, we run a centre tap for our secondary. The wire is taped to the axle on the left hand side to stop it flying around. Once the traverse has been adjusted and fine-tuned, the machine can run up to 1000 rpm and still get a neat wind. Doing a one-off like this can be very time consuming though, because the traverse drive needs to be tweaked for each wire size being used. 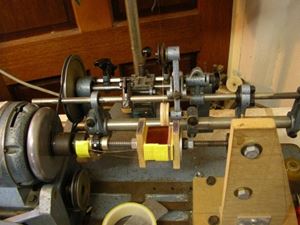 Another 720 turns, and the secondary is taped and terminated. Four layers of interleave insulation are added, and the first end of the primary is taped into place. We are using 0.3mm wire for the primary, which is easier to manage than the secondary, because it's thicker. 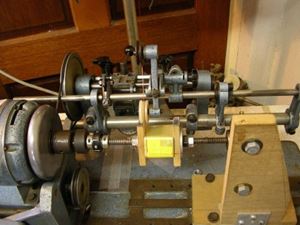 There is no chance that this thicker wire will snap - that's definitely a risk with the thinner secondary wire we've just used. There is no chance that this thicker wire will snap - that's definitely a risk with the thinner secondary wire we've just used.There's been many a coil where thin wire has snapped... which means we either do an ugly mid wind solder connection, or we start again.... Here is the end of the primary, eight rows later. This is an open sided bobbin, so we have to leave more clearance on each side of each row so the wire doesn't spill out. Because the primary wire is thicker, the wax paper isn't rigid enough to keep the coil neat, so we are using a clear polyester insulator instead. It's still only 25 micron thick, but it's stiffer. It can also withstand 2000 volts, so we're not messing about with our insulation. 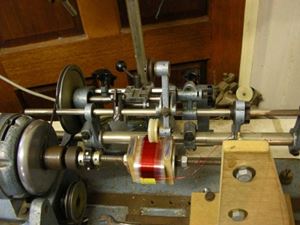 Here we have the heater turns. I've scavenged some old wire, and you can see the traces of the old insulation tape. We've only got one row of 1mm wire, and it will be taped in place since we are now at the top of the coil. Because the heater wire is thicker and heavier, I've used a combination of polyester insulation (for voltage insulation) and cardboard insulation (for mechanical rigidity) between the primary and the heater secondary. 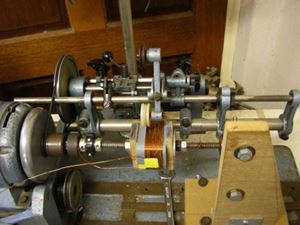 Here is the finished coil. 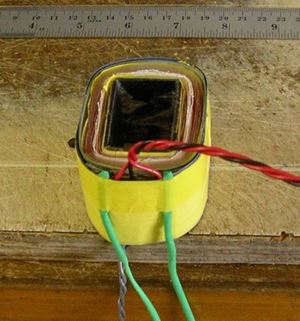 The primaries and secondaries have been tag soldered to a supporting board which sits under the outer insulation layer (sorry, I forgot to take a picture of this bit), and the heater wires have been covered with some heat shrink. The outer insulation is more polyester and two layers of cardboard insulation (0.5mm thick) to provide a solid outer surface for the coil. The final layer is a turn of adhesive insulation tape. And finally, the EI Lam has been fitted and the old end caps fastened in place.  We're not cleaning up the transformer covers this time, because we want to keep the old look of the original part. The next step is to dunk the whole thing in varnish and bake it for about two hours. A good varnish soak will remove air from between the layers and fill any voids in the winding, as well as providing protection against moisture for the rest of the transformer's life. We are recycling an old transformer which was previously varnished, so the laminations are no longer completely smooth. Dunking the whole assembly will stop any mechanical buzzes coming from the coil or the laminations. Here is the varnished transformer, looking much smarter with its coat of varnish. 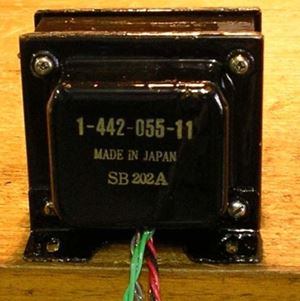 And finally, here is the transformer fitted to its new host - a little push pull five watt amp using a pair of 6BM8 triode/pentode valves. 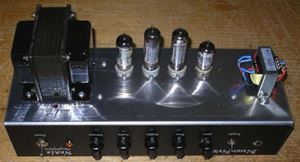
|
|
|
|
||
Neale Valve Amplifiers. pure vacuum, pure tone.
Site contents copyright Electric Triode 2008 - 2018 and all years in between.
